Sunday, May 31, 2009

Spring Vegetable Dinner - Part Deux

I know it sounds crazy, but Ramps stole my culinary mojo. I had been reading about them on a daily basis. They seem to be everyone's go-to ingredient when writing about exciting things to eat this Spring. I was intrigued, so intrigued that I made a special trip to track them down, and tediously read everything I could find to learn more about them. That is where the problem began. I think it caused me to lose the nerve to cook anything for a few days, paralysed by a loss of confidence. The more I read, the more I began to fear cooking with this really strong smelling member of the Allium family. As various sites warned about the negative effects of eating ramp dishes,"don't be surprised if people continue to keep their distance after a few days have passed!", and "Just beware of ramp belches; warn your co-workers and share at the lunch table", I quickly began to lose my nerve to give this harmless looking vegetable a try. I mean, why chance the potential embarrassment for a wild leek? I began to obsess for recipe ideas that would sound so delicious I'd be willing to risk people on the subway moving a seat away from me (now that I think of it, that might not count as a bad side-effect).

Ramp risotto, and scrambled eggs with ramps seemed to be ubiquitous, and failed to entice me. Pickled ramps was what I was leaning towards, but laziness kicked in, and since I didn't have a supply of canning jars laying around (although I might change that in a few weeks, once the CSA starts), I chose not to go buy them. What I settled on was Roasted Ramps.

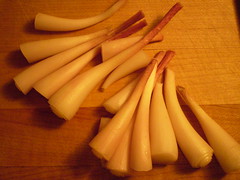
As roasting brings out the sweetness in an ingredient, I felt it might help the flavor, or at least make it taste better than it smelled. One problem was how long to roast them, and how high. They are substantially smaller then their cousin the leek, more like a scallion as you can see. I actually procrastinated so long on this decision, that I lost the tops. The green wispy part of the ramp, that is also edible, shrivelled up after some time in my fridge. That's when I realized it was time to act, or wait until next year. I kept coming back to a post by Meg from Megnut.com that seemed like a fail-proof idea. So, following her cooking temperature and time, I made a few quick additions and I was back in the game.

I am happy to report that I did not suffer any of the forewarned after-effects of eating ramps, but maybe that's because the roasting helped with that. I'm sure it would have been worse if I ate them raw. I must also report, for the sake of being totally honest, I don't get what all the hype is about. Sure, they were fine and a good way to add flavor to otherwise bland partners (potatoes, rice, eggs) but the flavor was somewhat subtle. I can't say that I'd prefer them to regular leeks, or onions, or garlic for that matter. But, I did enjoy the idea of eating a wild growing ramp that would only be around for a few weeks, and I think in the end, that's what really made the dish a bit special.

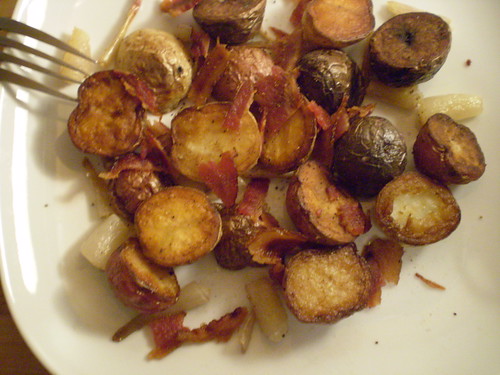
Roasted Ramps and New Potatoes with Bacon

Adapted from Megnut.com's recipe found here.
Keep in mind, this is more of a guideline than a recipe, any potatoes, or any additional seasoning would work great here.


1 bunch of ramps, cleaned and cut into equal size pieces.
2 handfuls of small-sized new potatoes, about enough to feed 2-4 people
4-5 slices bacon
Olive Oil
Kosher Salt and Black Pepper

Preheat oven to 375 degrees Fahrenheit. Prep the vegetables, slice the potatoes in half. Place a good swirl or two of olive oil in an oven-proof pan and allow to heat up. Toss the potatoes in and season with salt and pepper. Cook, stirring occasionally for about 5-7 minutes, or until the potatoes start to look crispy. (This step will ensure that your roasted potatoes have that good crisp exterior without the extra cooking time.) Place pan into the preheated oven for 10 minutes, and then toss in the ramp bulbs, or bottoms. Make sure to stir it all together to coat the ramps with the oil and seasoning. Place back in the oven for an additional 10 minutes, or until the ramps appear soft and fragrant. Meanwhile cook the bacon slices until crispy, then crumble and reserve.

After ramps have been roasting for about 10 minutes, that's the time to toss in the leaves (as you should, unless you're me and let them sit too long in your fridge) and allow them to cook for an additional 5 minutes. Take out of the oven and mix in the bacon pieces and some chopped parsley or cilantro for color.

Enjoy with the eggs of your choice, or really any main course.


Friday, May 22, 2009

Better-than-Before-Brownies

So, I found a wonderful reason to bake (cause I always want an excuse to bake) without feeling guilty about making large quantities of dessert for myself. A few really clever people who help run The Greenpoint Soup Kitchen thought up a way to include home-baked desserts on their menu, and in the process get more volunteers involved at the soup kitchen who wouldn't otherwise have had the time to help out. Thus, Dessert Corps was born, a team of volunteers who regularly sign-up to bake the assigned dessert for the week, when they have the time. This concept is really great for baking addicts like me who want a reason to indulge their crazy need to bake, and do something good for the community in the process. A win-win situation. I really hope that other soup kitchens around the city implement similar projects. There are so many baking fiends out there that, it shouldn't be hard to find volunteers in most neighborhoods. For more info, check out their blog: http://craigskitchen.wordpress.com

Back to the oven...this week I signed up for brownies.


In the past, I have steered clear of making brownies for others, having always failed to find a recipe that seemed to deliver the type of fudgey-chocolately brownie I wanted. I've tried recipes with a twist (adding coffee or banana) that all seemed intriguing, but the classic is what I wanted to master. I've tried recipes that utilized different types of chocolate, such as bittersweet, unsweetened, or cocoa powder, but there was never a clear winner (except maybe a clear loser, cocoa powder). I've also tried recipes that required an obscene amount of expensive chocolate, thinking that would surely be a winner for a chocoholic like myself, but the results weren't worth the expense. Why was it so difficult? Then I read an article from Cook's Illustrated, where an in-depth analysis of what was needed to concoct the perfect brownie was undertaken. Of course, I had to test their theory. Their attention to detail may have paid off in coming one step closer to perfection. I've tested their method three separate times so far. I've varied the brand of chocolate and the amount of sugar. The first time I made it, I pretty much followed the recipe verbatim, and used a higher quality chocolate. They came out super fudgey, almost gooey (possibly from being slightly under cooked) and a tad bit too sweet for my taste. I'm talking possible sugar shock sweet. Still, to my surprise people at work went gaga for them. I was flattered...but I was still not satisfied. I'm a perfectionist when it comes to my sweets. I promised my office taste-testers a few needed tweeks and another batch. Round-two, I used a smaller pan (8-inch, rather than the 13x9 inch) to have a higher brownie. I also decreased the amount of sugar by a bit and made sure not to under cook them. I thought they looked much better, although they received a much more lackluster reaction. Hmmm...stumped. Still through all this, this recipe is the closest I've ever come to a batch of brownies I can proudly offer up, even if the voice inside my head still thinks they're not perfect. This is one of those things I think I'll always be wondering what else is out there...but until I find it, these will do nicely.


Better-than-Before-Brownies
Adapted from Cook's Illustrated
The original recipe calls for cake flour, which should lead to a more delicate texture. I have read that cake flour is treated with chlorine, so I prefer not to use it. A quick substitution is 1 cup AP Flour minus 2 tablespoons.

1 1/4 cup unbleached all-purpose flour
1/2 teaspoon salt
3/4 teaspoon baking powder
6 oz. unsweetened chocolate
12 tablespoons unsalted butter
2 cups sugar
4 large eggs
1 tablespoon vanilla extract

Preheat oven to 325 degree Fahrenheit and take a 13x9x2 inch pan. Take parchment paper (or foil) and place on the inside of the pan with an overhang on both sides. Do
two pieces one going the length and the other going the width of the pan. This will help lift the brownies out of the pan. (If using foil, remember to butter or spray it to prevent sticking).

Whisk together the flour, salt, and baking powder. Set aside.

Set up a large bowl over a pot of boiling water (or use your double-boiler) and place the butter and chocolate in to melt. Keep an eye on it and stir frequently to prevent burning. When mixture is completely melted, whisk in sugar slowly. Next, whisk in eggs, one at a time. Then whisk in vanilla. Fold in flour mixture in three additions, folding and blending until batter is smooth.

Pour batter into pan and spread into corners and smooth out the surface. Bake for 30-35 minutes, or until a toothpick comes out almost clean (just a few crumbs is perfect). Cool on a rack until completely to room temperature. Then lift brownies out of pan and cut into pieces. Note - If you try to cut them to soon they will be a mess and the insides will stick to your knife. Patience Grasshopper.

Monday, May 18, 2009

Spring Vegetable Dinner -Part One

My first trip to the farmer's market this Spring was last weekend, where I acquired a beautiful vegetable that I had never heard of, and most certainly had never tasted. Despite my lack of knowledge, I felt inclined to buy it since it was the best looking piece of produce in the market that day. I left the market thinking I bought something called flowering cabbage, thanks to a helpful soul who tried to explain to me what it was. After doing some research, I realized that the these skinny stalks covered in a mix of leaves and little broccoli buds were not flowering cabbages, which seem to be something that you plant in your garden for decoration. I was quickly losing excitement about my mysterious find. Until yesterday. I was reading through the Spring chapter in this book (one of two amazing new cookbooks I received for my birthday - thanks guys!!) when I stumbled upon a recipe for Purple Sprouting Broccoli. Lo and behold, that was what was in my fridge. (I guess that guy in the market wasn't so far off. Broccoli is a cruciferous plant and therefore in the cabbage family.)

I must confess I'm definitely not the biggest broccoli fan, but I was going to forge ahead confident that I would feel differently this time. Plus, Jamie Oliver had supplied inspiration for a cheesy pasta dish to help. Maybe it was the calm that came over me from watching a giant bowl of cheese melt, that had me feeling confident that this wasn't going to be a flash-back to traumatic dinners where I was forced to try new vegetables as a kid. Or maybe, it was the fondue-like cheese sauce that had me practically salivating to try some...broccoli? Wow. So strange, but in the end this was certainly not like any broccoli I've ever had. It was slightly sweet, and once cooked reminded me of a Swiss chard. One of those work-horse vegetables that, no matter what you do with it, it adapts beautifully. The stalks did remain a bit tougher than the rest of the leaves, but maybe I just didn't remove enough of the bottoms. No matter, it was still quite tasty, and a welcome addition in this rich, silky pasta sauce. I think you should definitely give this a try if you find it in your market. I only hope it's not too late in the season to find some more. Next time I'll be brave enough to just try it sauteed in garlic and olive oil. Oh, and my Grandma thanks you, Mr. Oliver, for getting me to eat my vegetables.

Fettuccine with Purple Sprouting Broccoli and Cheese Sauce
Adapted from Jamie at Home, by Jamie Oliver

1lb. of Fettuccine or other broad noodle
1 bunch of Purple Sprouting Broccoli
6 oz. creme fraiche
5 oz. good melting cheese (I used an alpine-style cheese from here:
http://www.uplandscheese.com/)
5 oz. grated Parmesan
2 egg yolks beaten
Bunch of fresh herbs (I used tarragon, but oregano would be nice too)
Prep greens by
cutting off tough ends and cutting diagonally into reasonable size pieces. Boil
a pot of water for the pasta. About 3 minutes before it is done, toss in the
greens to cook. Strain when done, but reserve a bit (1 cup is more than plenty)
of the cooking water for the sauce.

Meanwhile, over another pot of
boiling water, place a large bowl with the creme fraiche, the two cheeses and a
bit of salt and pepper. Let this start to boil, stirring occasionally to break
up clumps of cheese.

When the sauce is completely melted add the egg
yolks and herbs and toss with pasta and greens until evenly coated. If needed to
make the sauce thinner, add some of the leftover pasta water. Top with more
grated Parmesan and some pepper.

Call your mom and tell her you ate your
broccoli today.


Wednesday, May 13, 2009

Sweet Potato O'Mine

I am sitting on my couch, asking myself what possessed me to turn on my oven to 450 degrees in May while my building is still supplying heat? Was it a desire to rush the season, and face the fact that I probably won't be able to make it all summer without buying an air-conditioner? No, maybe it was a desperate attempt to make use of these last few cool nights (it's in the 50's tonight) to convince myself that this type of cooking is still de rigueur. I mean, it's not summer. Yet.

Or maybe it was the magical power of a certain orange-skinned, funny-shaped, super-food had over me. Oh, sweet potato, oh sweet love of mine.

No, seriously, have you ever eaten a bad sweet potato dish? Probably not. Whether it's prepared in a sweet or savory manner, on a Thanksgiving menu, or in late Spring, this is one vegetable that I have always considered more closely aligned to treats and dessert than vegetables and super-foods. Which, brings me back to why I thought it not strange that instead of baking tonight, I made some sweet potato fries. The smell of sweet potatoes roasting in the oven fills your home with sweet smells just as baking would. The bubbling and crispy edges are just as difficult to resist as any batch of fried goodies would be. And one bite...one bite takes you away to that...we'll you'll have to try it for yourself.

Super Sweet Potato Fries

These really could go with any meal, but they also make a great snack to eat while watching late-night TV, if you made them in place of cookies, like I did.

Take 2-3 sweet potatoes (more if you're feeding a crowd) and peel them and slice them into equal size fries. Throw them on a rimmed baking sheet and toss with olive oil, kosher salt and pepper. Roast at 450 degrees Fahrenheit covered for 15 minutes, and then flip them and roast for an additional 30 minutes, flipping one more time. When they appear crunchy (them will get a bit more crunchy once out of the oven) toss with your choice of sweet or savory seasonings.

Sweet: cinnamon sugar and/or maple syrup;

Savory: Minced garlic (1-2 cloves) and your choice or chopped parsley or cilantro (see blurry photo below).

Wednesday, May 6, 2009

Seis de Mayo dinner

Thanks to the non-festive mood set yesterday (rain, the hysteria of swine flu, and a scary amount of laundry), the official Cinco de Mayo holiday was postponed in my kitchen, until tonight, the Seis. I had my mind set on some concoction I dreamed up. Chorizo and potato soft tacos inspired by a recipe for fried quesadillas with the same filling my cookbook called for (incidentally, this book, never fails me: http://www.amazon.com/Mexico-Beautiful-Cookbook-Susanna-Palazuelos/dp/0067575862/ref=sr_1_1?ie=UTF8&s=books&qid=1241671068&sr=8-1). I didn't feel like doing any frying and besides, it seemed like it wouldn't be worth the trouble unless I had the homemade masa tortillas pictured in the book. Actually, it tasted delish...and I'm positive it was a lot better than you're imagining. I added cilantro, for color, and well, because I think everything tastes better with cilantro. (It's becoming an addiction). Anyways, after filling a few soft tacos with chorizo-potato mash, I realized it was missing something... Always on the lookout for new combinations of sweet-n-salty, I dug out a neglected bottle of Trader Joe's peach salsa, and lo and behold, I had a very exciting impromptu creation.

In the midst of my post-dinner-success happy dance, I did stop to wonder if this meal was going against my goal to eat locally, when possible. I started thinking about the elements of the dish. I remembered that I read that local tortillerias exist in Brooklyn: http://www.ediblebrooklyn.net/magazine/index.php/spring-2009/indigenous-industry-spring-09.htm, but I wasn't sure how I would get local tortillas, short of visiting the source. Well, was I wrong. I took a look at my tortilla package... it was labeled Tortilleria Plaza Piaxtla. Wait a minute, hadn't I heard of that name somewhere? I double-checked, and it turns out that Piaxtla is one of the three manufacturing plants mentioned in the article. I could hardly believe it, mainly because I didn't purchase this product from a specialty store, but my local Key Food!! The local antithesis of Whole Foods. This is sort of a revelation for me. This local chain grocery, often reserved for "regular joe" neighborhoods, a one-time waste-land of anything local, organic or artisan, was suddently a grocery that carried food I'd only expect to find at fancier, yuppy-centric, food markets. It took me awhile to realize I'd been buying local tortillas, all along, but then again, Cinco de Mayo arrived late this year as well.

Dinner - Some roasted peppers in olive oil and salt and pepper I made for lunch tomorrow; Chorizo-potato tacos with peach salsa.

Moral of the Story - supporting small local food purveyors does not have to be something only those with extra money to spend at the grocery can partake in.

Monday, May 4, 2009

Important Petition from Food & Water Watch

Tell the Senate to Include Farms in the Foreclosure Relief Legislation:
http://action.foodandwaterwatch.org/t/5915/campaign.jsp?campaign_KEY=27190

Take action!! Preventing local farms from foreclosure is vital to LocalAppetite's goal, of eating good food that didn't rack up frequent flyer miles to get to your plate. Thanks!

Lunch - One salmon onigiri (home-made); small New-England Clam Chowder

Recently read and inspired by: The Snail, Slow Food USA's Magazine

Saturday, May 2, 2009

Conference for Change

Today was the Brooklyn Food Conference in Park Slope (http://brooklynfoodconference.org). It was quite a busy event, with a full booklet of all the workshops, talks, demonstrations, and vendors involved. I want to write in more detail about it, but it'll have to be at another point, cause I'm exhausted from the day. Next year, hopefully I'll hear about it ahead of time, and get a chance to volunteer.

Dinner - Farfalle with pesto and oven-roasted tomatoes;
3 oatmeal-raisen cookies and some grapes.

Recently read - lots and lots of literature I picked up from all the vendors at the conference.

Moral of the Story - There's a lot more than meets the eye (or that I've noticed) going on in local farming in Brooklyn.