Friday, November 20, 2009

Peanut-Sesame-Soba-Noodle-Salad


Cold sesame noodles are ubiquitous on Chinese take-out menus but I've never been a huge fan. The cold sticky sloppy mess of noodle just never appealed to me as much as other options. Then one day I was looking around for something to do with soba noodles (Japanese buckwheat noodles, if you're not familiar with them). They are one of my favorite healthy go-to staples in the pantry and what reminded me this would be a good submission for Fight Back Fridays. Soba are often served in noodle soups, or served cold with a dipping sauce. That is what gave me the idea for this dish. A noodle salad that I could whip up for work week lunches, as well as a light dinner that would be more substantial than a green salad. The items that you add in can be altered to suit your preferences or what's in your fridge that night.

A quick dressing of creamy peanut butter (all-natural of course), soy sauce, sesame oil, ginger, garlic and honey are blended together to make the dish. I think the peanut-sesame combo is the key here. Peanut-sauce is often too much peanut-butter flavor with nothing else. Here, when mixed with the soy sauce and enough heat (from red pepper flakes or sriracha) it is more balanced and, frankly more interesting than the one-note flavor it has on its own.

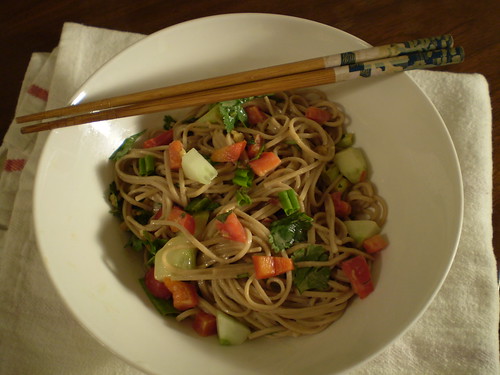
The only add-ins to this salad I strongly suggest be included are chopped scallions and cilantro, to keep with a South-Asian flair. These flavors just work together and brighten up the peanut-flavored sauce. The rest is up to you.

Make a batch of this to have on hand during a hectic week of pre-Thanksgiving cooking madness. As long as the dressing is made, you only have to take the 3 minutes to boil the soba noodles to pull it all together. Save yourself from greasy take-out in the weeks leading up to Thanksgiving. Or, take this for lunch the week after, because there are only so many leftover turkey sandwiches that any person should have to endure.

Peanut Sesame Soba Noodle Salad
Adapted from Recipezaar. Do not dress the noodles too far in advance or they may get a bit soggy.

For the dressing:
1/2 cup smooth all-natural peanut butter
1/4 cup soy sauce
1/3 cup warm water
2 tablespoons peeled fresh ginger, chopped
1-2 teaspoons fresh minced garlic
2 tablespoons rice wine vinegar1 1/2 tablespoons sesame oil
3 teaspoons honey
1/2 teaspoon crushed chili pepper flakes or sriracha

For the salad:
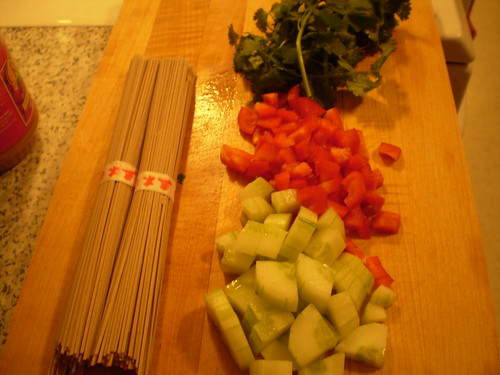
1/2 package soba noodles, cooked and rinsed under cold water
3 scallions, chopped (green and white parts)
1 red bell pepper, seeded and cut into thick strips
1/2 cucumber, seeded and chopped
1 large handful of cilantro

Using a blender puree all the dressing ingredients until smooth (about 2 minutes). Alternatively, whisk all ingredients until they appear well combined.

Cook the soba in a large pot of boiling salted water until tender about 2-3 minutes; drain and rinse well under cold water to stop the cooking. Transfer to a large bowl, then add in the remaining salad ingredients.

Just before serving pour the dressing over the cooked pasta and veggies. Toss well to combine.

Sunday, November 15, 2009

Testing-New-Thanksgiving-Desserts-Fig-Crostata

PB140051.JPG
I'm a sucker for a pretty package, so when I saw the photo of the crumbly, flaky, lattice-topped fig crostata in November's Gourmet magazine, I instantly wanted to make it. I thought finding a new option for the dessert table on Thanksgiving could be a good idea. Then I remembered I come from a family of non-adventurous eaters, and die-hard traditionalists. It's apple or pumpkin or nothing. I figured that should not hold me back. I could bake this a week early, and find out for myself if it was as delicious tasting as it was attractive. Maybe it would be worth trying to convince my dining companions this Thanksgiving to give something new a try.
PB140029.<span class=
A crostata is an Italian form of pie made of a shortcake cookie-type of dough. It has as many variations and the internet is filled with recipes where a crostata dough is used as a free-form crust where the sides are folded around the filing, similar to a French galette.
PB140041.<span class=
This recipe is made in a springform pan, where the crumbly dough is rolled out and simply pressed into the pan and up the sides. That's easy enough. The lattice-top is a bit more involved. I'll admit anytime I've tried to make a lattice-topped pie crust it ends with a lot of cursing and frustration as my strips soften and fall apart as I try to place them on top. Inevitably I often throw my hands up in defeat and roll the whole mess into one big ball and try for a normal pie crust. But, I finally have figured out that the freezer is my friend and I can fix this problem by popping the strips into the freezer to flash chill if they get difficult to work with. This trick saved the day and made the intricate, impressive looking top easy enough for even novice bakers.
PB140045.<span class=
The filling smelled incredible while cooking and filled the kitchen with those warm spice aromas that we associate with the holidays. I'm sad to say that when it was all pureed and baked it tasted like an orange flavored fig newton. It was tasty, but the similarity to a fig cookie made it not that desirable as a holiday dessert. On the other hand, it also made it seem healthier than a pie and I ate it for breakfast today.

My official taste-test verdict? If you're a fig enthusiast, this pie is worth a try. But be prepared for the harsh reality that like me, you find that you are more like your family than you care to admit, and realize that it ain't turkey day without a pumpkin pie.
PB140060.<span class=
Fig Crostata
Recipe from Gourmet Magazine, November 2009

For Pastry Dough
2 cups all-purpose flour
1/4 cup granulated sugar
1/2 tsp salt
1 1/2 sticks cold unsalted butter, cut into 1/2-inch cubes
2 large egg yolks
1 tsp vanilla extract
1 Tbsp cold water

For Fig Filling
12 oz soft dried figs, stemmed and coarsely chopped
1 1/4 cups water
1 cup fresh orange juice
1/2 cup packed dark brown sugar
1 stick unsalted butter, melted and cooled
3 large eggs, lightly beaten
1 tsp vanilla extract
1 tsp grated orange zest
1 1/2 cups walnuts, coarsely chopped

To make the dough:
Blend together flour, sugar, salt and butter in a food processor just until mixture resembles coarse meal with some roughly pea-size butter lumps (alternatively do this in a bowl with your fingers). Add yolks, vanilla and water and pulse until incorporated and dough begins to form large clumps. Turn dough onto a lightly floured surface and divide into 4 portions. With heel of your hand, smear each portion once or twice in a forward motion to help distribute fat. Gather all dough together then divide dough in half and form each half into a 5-6 inch disk. Chill, wrapped in plastic warp, until firm at least 1 hour, or up to 3 days.

To make filling:
Simmer figs, water, orange juice, and brown sugar in a medium saucepan, covered, stirring occasionally, until figs are soft and mixture is reduced to about 2 cups, 15 to 20 minutes. Pulse in a food processor until finely chopped (mixture should not be smooth). Transfer to a large bowl and cool slightly. Stir in butter, eggs, vanilla, zest and walnuts.

To make tart shell:
Butter a 9-inch springform pan. Roll out 1 portion of dough between 2 sheets of parchment paper into a 12-inch round (dough will be soft; chill or freeze briefly if it becomes difficult to work with). Peel off top sheet of parchment and carefully invert dough into pan. (Dough will tear easily but can be patched together with your fingers). Press dough onto bottom and 1 inch up side of pan, then trim excess. Chill tart shell until ready to assemble.

Roll out remaining dough between parchment into 12-inch round. Peel off top sheet of parchment, then cut dough into 10 (1-inch wide) strips and slide (still on parchment) onto a tray. Chill until firm, about 10 minutes.

Assemble crostata:
Spread fig filling in shell. Arrange 5 strips of dough 1 inch apart on filling. Arrange remaining 5 strips 1 inch apart across first strips to form a lattice. Trim edges of strips flush with edge of shell. Sprinkle top with sugar.

Preheat oven to 350 degrees Fahrenheit. Bake until filling is slightly puffed and pastry is pale golden, about 30 minutes. Cool completely, then remove side of pan. Gourmet suggests you serve crostata with mascarpone.


Saturday, November 7, 2009

Curry-in-a-hurry-squash-soup


I don't have many recipes that I make over and over again, preferring rather to keep experimenting and trying new dishes. There are so many delicious things to eat it's hard for me to keep eating the same old things. Sometimes. This soup is one of the few exceptions to that rule. It's been in my repertoire since I started cooking post-college. It's incredibly versatile, healthy, quick and economical. It can be eaten hot or cold. It can be made with summer or winter squash. What more do you want from a recipe? Not much. You can see why even if I wanted to move on from this soup and leave it in the past, it would be difficult.

The original recipe, that I often make without much variation to it came from a short-lived but much beloved food magazine, Taste. It was an oversized glossy filled with beautiful photos of gorgeous places and foods around the world published by Williams-Sonoma . That was the first time I mourned a magazines demise. Gourmet was the second (cue the heavy sigh).

Zucchini-curry soup as the recipe called for was served cold and as a first course. My version of zucchini-curry soup is served hot over rice (of any type) and as a one-dish meal, perfect for lunch or a light dinner. This has been my go-to meal for many, many years. In fact, I spent one week of being unemployed years ago eating this for lunch and dinner in its various forms, hot and cold, with rice and without. It didn't let me down. I have even seen the recipe re-purposed in a Williams-Sonoma soup cookbook, where it was prepared with fresh oregano in place of the curry. I like curry way too much to bother switching it out, but I assume it's safe to try other spices if curry isn't your thing.

Now that it is November, winter squash is more likely what you may have on hand, instead of zucchini (which is what I had this weekend). I think any type of squash and curry are a natural pairing. To keep the soup seasonal, merely roast winter squash (acorn or butternut perhaps) for an added layer of flavor rather than cooking it in the stock, and then mix with the rest of the ingredients before pureeing. Now you have a basic blueprint for a squash soup than can be adapted into a Spring-Summer soup, or an Autumn-Winter soup and that's all the reason you need to make this soup over and over again.


Zucchini Curry Soup
Adapted from Taste magazine.

1 large onion, cut in half and sliced thin
2 tablespoons, olive oil
2 teaspoons, curry powder (I use Madras-style curry)
pinch of sea salt or kosher salt
4 zucchini, sliced into thin rounds (or about 2 winter squash)
4 cups, chicken stock (although vegetable would be fine too)
plain yogurt for garnishing

In a large pot, combine onion, olive oil, curry powder and salt. Stir over low-medium heat until onions soften, about 3 minutes.

Add stock and zucchini. Cover and simmer for about 20 minutes, stirring occasionally, until vegetables are softened. (If using winter squash, roast them first at about 400 degrees Fahrenheit for 40 minutes with a little olive oil, scoop out flesh and add to put of onions and stock instead of this step.)

Puree vegetables and stock with an immersion blender or in a regular blender in batches, until it is a smooth texture. Add salt and pepper to taste. Serve with a dollop of yogurt on top.